Monday, December 31, 2012

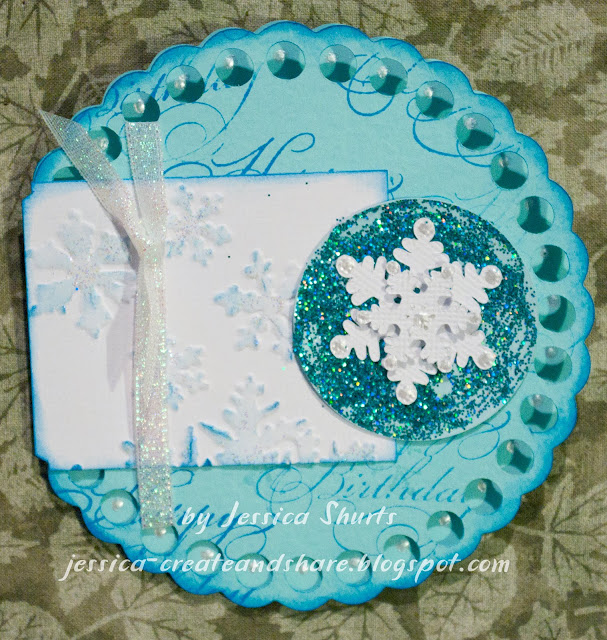
Snowflake Birthday Card

I got another card done this afternoon. I'm trying to be a little ahead of the game with birthday cards since I don't know when this baby is going to decide to make his/her entrance into the world. :)

I used this week's Mojo Monday sketch and decided to try a circular card.  I saw this circle card cut on my "Tags, Bags, Boxes and More 2" cartridge when I first got it and I have been itching to try it.

I also worked the 7th day of Christmas challenge from Frosted Designs in.  The challenge was to include 7 snowflakes on a project.  I have two that I cut out using my Cricut and the same cartridge I used for my card, 4 that are dry embossed into the white and one more stamped on the inside of the card.  I also had fun with some more glitter- I am LOVING this color!  

January 2013 calendar page

Happy New Year's Eve!  Can you believe it is the end of another year?!  Today I am sharing my January 2013 Project 12/calendar page.  This is the beginning of my second year scrapping in this format. I really enjoyed making these recap pages over the past year, so I look forward to continuing.

I based my layout of Sketch #245 from Nuts About Sketches.  I also plan to continue using Shawn's sketches in the year ahead because her two pagers usually include space for lots of photos which is perfect for my pages!

I also worked a couple of challenges into this layout.  The first is the 12th day of Christmas challenge at Frosted Designs which was to use at least 12 brads.  I ended up using 19!  I used sets of them in the place of the stitching in the sketch.  I liked the whimsical touch it gave.  

I also did the 12/19 scrap(word) challenge at My Scraps and More.  The challenge was to use the word "Everyday" on a layout.  I ended up stamping it as part of an accent in the bottom right as part of the phrase "cherish everyday".  

I received a huge set of American Crafts glitter from my sister-in-law for Christmas, and I had a blast playing with that on this layout.  After I had cut my title with the Cricut, I put glue in strategic places and sprinkled on some white tinsel glitter to look like snow.  I also covered the smaller circle snowflake accent on the right page with the white tinsel glitter.

Materials:
Cardstock- American Crafts, Bazzill
Patterned Paper- Recollections
Brads- Basic Grey, Making Memories, Deja Views
Pens- Sakura, Marvy, Tsukineko
Die Cutter- Provo Craft
Cartridge- Stretch Your Imagination
Software- Sure Cuts A Lot
Font- Backhand Brush
Journal Spots- Recollections, Bo Bunny
Stickers- Cosmo Cricket, EK Success
Glitter- American Crafts
Punch- marvy
Stamps- Fiskars
Ink- ColorBox
Mist- Ranger

Sunday, December 30, 2012

Birthday Card

I've been busy scrapping today. I completed a layout and a card, both for the 12 days of Christmas challenges at Frosted Designs. I am sharing the card now and will share the layout tomorrow.

 For this card, I did the 9th day of Christmas challenge which was to use 9 pearls or gems. The gems are from the Michael's "bling on a roll". The gems come clear, but I colored mine with some purple alcohol ink to make them match my card.

I also did the 12/23 card challenge at My Scraps and More, which was to use at least 3 triangles on a card.  I decided to make a banner with my triangles.  The paper I used was white with glitter embossed snowflakes.  I inked the paper with purple and pink Distress Ink to make the snowflake stand out.

To be honest, I am not totally thrilled with how this one turned out, but it was fun to play.  :)

2013 Calendar Reveal!

Here it is, the entire calendar!  These are the 8 1/2 x11 pages, I also made a 8x8 calendar, using the same papers and sketches.  All of the sketches were from Nuts About Sketches, the sketch number is listed and linked below the calendar page.


Saturday, December 29, 2012

A Couple of Calendar pages

I have two calendar pages to share today, I will be revealing the rest tomorrow! I am posting these two today because I did them for a couple of the 12 days of Christmas challenges at Frosted Designs.

The first day of Christmas challenge was to use a bird.  I used a scrolly Glimmer Glass bird on my November calendar page.

The 4th day of Christmas challenge was to use 4 different patterned papers.  Three are pretty easy to see, the presents in the bottom left were cut from the 4 sheet.  I will be adding photos to this layout later.  I wanted to include photos from Christmas, and since this is a Christmas gift, this is the best option I have found.  

Friday, December 28, 2012

20 Weeks

This is the first layout I've done (other than calendar pages) in a long time!  I had so much fun playing on this one.  I used some of the images from my 20 week ultrasound, which was 3 1/2 months ago!

I started with sketch #95 from Sketches in Thyme. I worked in the stitched circles from the 12/21/12 scrap(find) challenge at My Scraps and More. Finally, I also was able to work in the 3rd day of Christmas challenge from Frosted Designs: use three inks, mists, or paints.

As you can see, I stuck pretty close to the sketch, except that I used rectangular photos instead of square ones. It was pretty easy to incorporate the scrap(find) challenge since there was a large circle element in the sketch.

The large circle element also allowed me to play with my new Inkadinkadoo Stamping Gear. I used the circles stamp included in the kit and first stamped it in pink, then flipped the paddle and stamped it in black. I am excited to play with this more! The third ink that I used (for the Frosted Designs challenge) was Weathered Wood Distress Ink around the edges of my papers.

For my title letters, I had these chipboard letters that punched out of chipboard squares.  I didn't have an 's' or two 'e's', but I had the squares that they punched out of.  I cut around the letters to leave a border, glued those frames to patterned paper and then cut them out.  I filled in the letters with Glossy Accents and then pressed beads into them.  I know I saw this idea some time ago in a magazine, so I cannot take credit for it, but this is the first chance I've had to use it, and I am happy with the results!

Materials:
Cardstock: Bazzill
Patterned Paper- October Afternoon and Echo Park
Chipboard- Lil Davis Designs
Ink- Ranger, Colorbox, American Crafts
Stamp- EK Success
Rub Ons- American Crafts
Sticker- Hambly
Vellum- K and Company
Beads- Me and My Big Ideas
Journaling card- October Afternoon
Pen- Zig, Provo Craft
Twine- Pink Paislee
Die Cutter- Provo Craft
Cartridge- All Mixed Up
Glitter Glue, Liquid Pearls, Glossy Accents- Ranger
Thursday, December 27, 2012

Man Cards

Today I have two masculine cards that I made recently to share. I have two brothers-in-law who celebrate their birthdays this time of year.

This first card I made using scraps from my November calendar pages (which I will be sharing very soon, I have one more to give!)  I did this one for two challenges: the 12/9/12 card challenge at My Scraps and More (use chipboard) and the 2nd day of Christmas challenge at Frosted Designs (use two stamps).  The brown piece is chipboard that I colored with Walnut Stain Distress Ink.  I let that dry overnight and then I stamped and heat embossed the fox.  The sentiment is also stamped and heat embossed.

The second card used the current sketch at Unscripted Sketches.  I also did it for the 5th day of Christmas challenge at Frosted Designs which was to use 5 gold/yellow items.  I used yellow patterned paper, yellow ink for the leaf, and yellow embossing powder on the three words of the sentiment.  The leaf was stamped with Resist Ink on Glossy Cardstock.  I dried it with a heat gun and then used a brayer and Wild Honey Distress ink over it.  I then fussy cut the leaf.  For the background of my card, I used the Inkadinkadoo Stamping Gear that I received as a Christmas gift.  I got to try this out at Scrapfest and really enjoyed the effect so it went on my Christmas list!

Wednesday, December 26, 2012

Christmas Crafting

I've spent the last month doing several "off the page" projects as Christmas gifts. It has been fun to play with some different media and try some new things, but it was also great to make a layout again today.

My first project was a set of coasters for my grandma. I decided to use photos of the grandchildren and great-grandchildren. I used a digital glitter frame on all of them that I had recolored using the Hue/Saturation sliders in PSE. These coasters were super easy to make and you can find all kinds of tutorials all over the Internet. I give a quick step-by-step of what I did.
1. Select photos, crop and add any design elements in PSE.
 2. Print on regular copy paper. Cut out photos.
 3. Brush a thin coat of Mod Podge onto white ceramic tiles. Lay photos onto wet Mod Podge.
 4. Brush a thin coat of Mod Podge over the photos to seal them in.
 5. Allow to dry then coat a second time.
 6. Spray with two coats of Acrylic sealer, allowing to dry in between.
 7. Glue felt to the back of tiles.


Our MOPS (Mothers Of Preschoolers) group did an ornament exchange for our Christmas party.  I decided I wanted to try my hand at making an ornament.  I found this great tutorial on how to make a paper pinecone ornament.  This was relatively easy and didn't take a lot of time (probably about an hour and a half).  


Finally, I made a Christmas card for our priest to hold our gift to him.  As I was making this card, I realized that all of my Christmas paper, stamps, and other crafting supplies are very secular.  I will definitely have to do something about that!  I ended up searching the Internet for a free digital image to use on my card.  I found this one here.  I also used the current sketch at Sketch Saturday as inspiration for my card.  The base of the card was embossed using the Tim Holtz Alterations Snowflake folder.  I edged the card and all the pieces with Walnut Stain Distress Ink.  I also lightly ran my inking tool over the snowflakes to make them stand out more.


I have some more projects to share in the coming days, so stay tuned!

Tuesday, December 25, 2012

Merry Christmas!

I hope you are all having a wonderful Christmas!  I hope to be back later this week with some projects!